Save energy and put your unused computers immediately to sleep if they support power-saving mode (most do) then wake them up when you need to connect remotely. If you have lots of devices to manage then this guide might be useful.
Not only that, some internet or mobile connections doesn’t support WOL because the UDP port (usually UDP port 9) to forward the magic packet is blocked. I’ve encountered several times that WOL apps doesn’t work because of this even when I’ve already opened the UDP port in my router. The only way is to connect (i.e. via SSH) into one of your waked device and issue the wake command manually to the computer you need to wakeup.
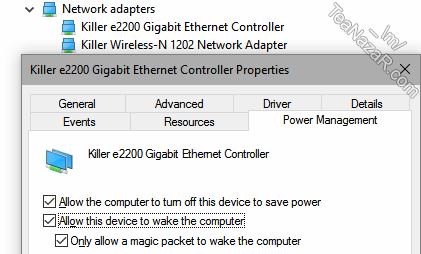
To ease this process, setup WOL web access on your NAS, in this case the WDMyCloud. You’ll need to ensure your computers are able to wake up by magic packets. Go to your network adapter properties in the “Device Manager” and make sure your LAN adapter is allowed to wake the computer. Note that these wake up settings might revert to default if you update/downgrade your LAN adapter drivers or upgrade/restore your OS.
LAN Adapter
Then setup your computer to sleep after a while in the “Power Options” found in the “Control Panel”. Also change the power button to sleep instead of shutdown to quickly put it to sleep. Note that these power options might revert to default if you upgrade/restore your OS.
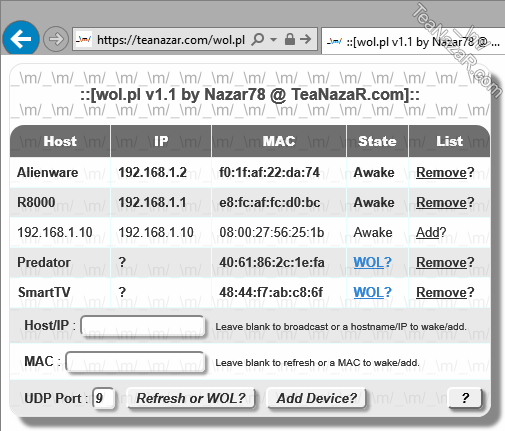
Next is to install my universal “wol.pl” Perl script in a webserver. It works for any webserver with Perl-CGI in this case Apache2 which is the pre-installed webserver in WDMyCloud. This requires modifications to the WDMyCloud Apache2 webserver. But if you’re not comfortable doing this yourself, you can also perform the automated install of Nginx from my post WebHosting on WDMyCloud V4 Firmwares and then symlink the “wol.pl” Perl script to your installed Nginx’s webroot path. Symlink sample is stated at the last point. Note, if you have installed Nginx from my “WebHosting Mods” installer post link above, do not modify Apache2’s configurations as below because it’s using a different incompatible “MPM_Event” module! Instead just follow the part where it doesn’t involves Apache2 changes.
Disclaimer: As I’m frequently updating the original guides and installers here on TeaNazaR.com, I will not be responsible for any brick issues if you were to follow my obsolete guides copied elsewhere. Thus subscribe to this post to get latest updates. Modifying any part of a device may void its warranty.
Modifications to WDMyCloud WebServer to enable Perl CGI
Open TCP port 80 on your router to the WDMyCloud, similarly you would have done for SSH port 22 and FTP port 21. This depends on your router, search online on how to do it for your specific router, if necessary. If you’re lucky, the port 80 maybe already selected and opened in the WDMyCloud Dashboard. For Nginx, note the port route stated in my guide was
Router:80->WDMyCloud:5080.
For Apache2, create a new CGI config file
nano/etc/apache2/conf.d/cgi.conf then copy & paste below:
Shell
1
2
3
4
5
6
7
8
9
<IfModule mod_cgi.c>
AddHandler cgi-script.cgi.pl
<Files~"\.pl$">
Options+ExecCGI
</Files>
<Files~"\.cgi$">
Options+ExecCGI
</Files>
</IfModule>
Then “CTRL+x” to exit and “y” to save.
Enable the Apache2 CGI module, issue
a2enmod cgi then reload Apache2 server daemon, issue
service apache2 reload . Remember once again to skip the above if you already have Nginx installed from my installer.
Copy the “wol.pl” Perl script found at the bottom of this post to any path on your WDMyCloud, give it an executable permission
chmod755/shares/scripts/wol.pl and HTTPD ownership
chown www-data:www-data/shares/scripts/wol.pl.
It’s recommended to hide the script from public, best password protected, path e.g. here
./private/. This method is also applicable if you had installed Nginx from my installer except the default webroot for Nginx is
cd/var/www/html/ and Apache is
cd/var/www/htdocs/. After changing to the appropriate webroot path above, now create a new
./private/ folder in the webroot, issue
mkdir-pm755./private/. Then password protect the path for user e.g. “username”, issue
htpasswd-c./private/.htpasswd username and enter a “password”, enter again to confirm.
Next is to enable the access control for this path.
For Apache2, create a new “.htaccess” file,
nano/var/www/htdocs/private/.htaccess then copy & paste below:
Shell
1
2
3
4
AuthType Basic
AuthName"Authentication Required"
AuthUserFile/var/www/htdocs/private/.htpasswd
Require valid-user
For Nginx, instead of “.htaccess” file, add below to your server directive config i.e.
nano/etc/nginx/sites-enabled/default:
Then reload Nginx server daemon, issue
service nginx reload. For either above, remember to “CTRL+x” to exit and “y” to save.
And finally, symlink the original “wol.pl” Perl script you had created earlier to the webserver’s webroot, issue
ln-s/shares/scripts/wol.pl./private/.
Now to wakeup your computer, simply access the script on your webserver e.g.
http://wdmycloud.your.isp.ip.or.domain/private/wol.pl then login using the “username” and “password” you had created earlier. How to remember your dynamic ISP address? Checkout the first part of my post in WebHosting on WDMyCloud V4 Firmwares.
Enjoy (-:
wol.pl
Perl
1
2
3
4
5
6
7
8
9
10
11
12
13
14
15
16
17
18
19
20
21
22
23
24
25
26
27
28
29
30
31
32
33
34
35
36
37
38
39
40
41
42
43
44
45
46
47
48
49
50
51
52
53
54
55
56
57
58
59
60
61
62
63
64
65
66
67
68
69
70
71
72
73
74
75
76
77
78
79
80
81
82
83
84
85
86
87
88
89
90
91
92
93
94
95
96
97
98
99
100
101
102
103
104
105
106
107
108
109
110
111
112
113
114
115
116
117
118
119
120
121
122
123
124
125
126
127
128
129
130
131
132
133
134
135
136
137
138
139
140
141
142
143
144
145
146
147
148
149
150
151
152
153
154
155
156
157
158
159
160
161
162
163
164
165
166
167
168
169
170
171
172
173
174
175
176
177
178
179
180
181
182
183
184
185
186
187
188
189
190
191
192
193
194
195
196
197
198
199
200
201
202
203
204
205
206
207
208
209
210
211
212
213
214
215
216
217
218
219
220
221
222
223
224
225
226
227
228
229
230
231
232
233
234
235
236
237
238
239
240
241
242
243
244
245
246
247
248
249
250
251
252
253
254
255
256
257
258
259
260
261
262
263
264
265
266
267
268
269
270
271
272
273
274
275
276
277
278
279
280
281
282
283
284
285
286
287
288
289
290
291
292
293
294
295
296
297
298
299
300
301
302
303
304
305
306
307
308
309
310
311
312
313
314
315
316
317
318
319
320
321
322
323
324
325
326
327
328
329
330
331
332
333
334
335
336
337
338
339
340
341
342
343
344
345
346
347
348
349
350
351
352
353
354
355
356
357
358
359
360
361
362
363
364
365
366
367
368
369
370
371
372
373
374
375
376
377
378
379
380
381
382
383
384
385
386
387
388
389
390
391
392
393
394
395
396
397
398
399
400
401
402
403
404
405
406
407
408
409
410
411
412
413
414
415
416
417
418
419
420
421
422
423
424
425
426
427
428
429
430
431
432
433
434
435
436
437
438
439
440
441
442
443
444
445
446
447
448
449
450
451
452
453
454
455
456
457
458
459
460
461
462
463
464
465
466
467
468
469
470
471
472
473
474
475
476
477
478
479
480
481
482
483
484
485
486
487
488
489
490
491
492
493
494
495
496
497
498
499
500
501
502
503
504
505
506
507
508
#!/usr/bin/perl
usestrict;
usewarnings;
useIO::Socket;
# wol.pl v1.5 by Nazar78 @ TeaNazaR.com
#######################################
# Simple Unix/Windows WakeOnLAN CGI script.
# It scans your arp list to display available device on the LAN.
# You can add/remove devices or wake them up from the saved list.
#
# Requirements:
# - A webserver i.e. IIS/Apache/Nginx with Perl-CGI.
# - Unix (ifconfig/ping/arp) or Windows (ipconfig/ping/arp).
# - Unix user running Perl-CGI i.e. 'www-data' needs sudo access i.e.:
# /etc/sudoers:www-data ALL=(ALL) NOPASSWD: ALL
#
# History:
# v1.0 - 20141105 - 1st release.
# v1.1 - 20151004 - Enhanced the webUI to manually add new device.
# v1.2 - 20151112 - Added pings for offline hosts to help build arp list.
# v1.3 - 20160520 - Fixed UDP input on certain browsers. Display saved hosts over active IPs.
# v1.4 - 20190722 - Fixed finding MAC address for Unix chroot environments.
# v1.5 - 20210122 - Fixed warnings appearing in logs.
#
# PS: Feel free to distribute but kindly retain the credits (-:
Another source about WOL for myCloud says that “older” version of MyCloud don’t support WOL. I have tried other WOL solutions (just sending broadcasting the magic packet 255.255.255.0 and other similar ideas) but haven’t had any luck so far.
Is there some command I can issue to determine if my 4TB MyCloud Firmware V4* will do WOL?
(What a great resource you are!)
Thanks
Neil
Chicago, IL


wol.pl Updated!
v1.2 – 20151112 – Added pings for offline hosts to help build arp list.
wol.pl Updated!
v1.3 – 20160520 – Fixed UDP input on certain browsers. Display saved hosts over active IPs.
Another source about WOL for myCloud says that “older” version of MyCloud don’t support WOL. I have tried other WOL solutions (just sending broadcasting the magic packet 255.255.255.0 and other similar ideas) but haven’t had any luck so far.
Is there some command I can issue to determine if my 4TB MyCloud Firmware V4* will do WOL?
(What a great resource you are!)
Thanks
Neil
Chicago, IL
Hello Neil,
This variant of MyCloud does not support WOL. The post is about setting up to wake up other devices within the network that support WOL.
Nazar,
Thanks very much for clarifying. At least I won’t spend any more time trying to get WOL to work!
Neil
Chicago, Illinois
Hello Neil,
No problem, do let me know if you need any other help 🙂
This is awesome Nazar!!!
Do you think you can provide some guidance on how to apply your script to a RPi with already installed with nginx?
Hello egas,
Firstly you’ll need to setup some stuffs…
Get the fcgi wrapper:
wget http://nginxlibrary.com/downloads/perl-fcgi/fastcgi-wrapper -O /usr/bin/fastcgi-wrapper.plGet the fcgi service starter:
wget http://nginxlibrary.com/downloads/perl-fcgi/perl-fcgi -O /etc/init.d/perl-fcgiGive executable permission to the files above:
chmod +x /usr/bin/fastcgi-wrapper.pl /etc/init.d/perl-fcgiSetup perl-fcgi to run on boot:
update-rc.d perl-fcgi defaultsStart the perl-fcgi service:
service perl-fcgi startAdd below to your nginx’s config:
location ~ \.pl|cgi$ {fastcgi_pass 127.0.0.1:8999;
fastcgi_param SCRIPT_FILENAME $document_root$fastcgi_script_name;
include fastcgi_params;
}
Reload nginx:
service nginx reloadThen finally place my script anywhere in your nginx’s www root.